Searching for a specific blog post? Try here:

You Can Make Your Own Sausage (Swedish Potato Sausage)

I don’t have any pictures of how the sausage is made. Sorry.

You are probably going to get more consistently good flavor and texture if you pay a professional butcher to make sausage for you. However, making your own sausage at home is really easy, you can control exactly what goes into it, and there are way more varieties of sausage you can try than you could possibly find at a butcher shop.

For this past Christmas (I know, it’s May) we made Swedish Potato Sausage. We normally try to make something from our families’ heritage for Christmastime, so a year or so ago it was Sauerbraten (which was…weird. Okay, but weird. Sorry Deutschlanders.) This past year it was Swedish Potato Sausage.

The recipe for Swedish Potato Sausage is basically equal parts by weight of pork and potato, a few onions, salt, pepper, allspice, and some milk to help stick it together. Then stuff it in pig intestine.

Unfortunately it appears to be impossible for small scale meat processors that serve small, local farms to reserve the hog intestines, so unless you slaughter your own animal and are able to save and clean the intestines, you will probably have to buy natural casings. You can find them occasionally in gourmet stores or order them online. They come in a vacuum-packed bag with a whole lot of salt. They'll keep for several months in the refrigerator, usually. When you open the bag, it smells like, well, pig intestines. You need to rinse them A LOT in cold water including running cold water through them, and then they shouldn’t smell. This also removes most of that salt.

If you don’t want to use natural hog casings there are other varieties available, including collagen casings. You need to make sure you read what size casing you are buying: they go by diameter. Don’t mistakenly order the thin-diameter casings for breakfast links if you want to make brats. The casings don’t really stretch; if you fill them up too much, they burst, and then you have to start over.

The Mahabharata of homemade sausage making is probably “Great Sausage Recipes and Meat Curing”, by Rytek Kutas, founder of The Sausage Maker in Buffalo, NY. You can buy it directly from them, and you should, because guys who write a book about how to make sausage are cool. It’s mostly technique though, and kind of short on recipes compared to how stuffed the Internet is with every imaginable kind of sausage recipe.

A meat grinder attachment for a stand mixer is pretty useful. You can often find this kind of thing used, or “refurbished”, and let’s face it, a 10 year old mixer or mixer attachment is possibly better made and going to last longer than one made currently. However, you clearly don’t need all this, since people have been stuffing sausage with just a funnel for, well, forever. The benefit of a meat grinder / sausage stuffer is that grinding your ingredients together mixes them for you, so you get better consistency and not, say, a chunk of one thing followed by a chunk of something else. You could, however, grind in a food processor, or just chop everything with a sharp knife or two.

Anyways, making your own sausage at home is one of those things that is so easy, it’s weirdly sinister that more people don’t do it. If you want to make smoked/cured sausage you still need a way to smoke it, you still need to add nitrite, and you need to know what you’re doing there so you don’t get botulism. If making normal, uncooked sausage, you should plan to make 10 or 20 pounds at a time and then freeze it; there’s not much point in making only enough for a single meal. You are likely going to make a bit of a mess in the kitchen, probably, and prepping and stuffing 20 pounds of sausage takes a few hours. However, there are sausage recipes for everything in your freezer that you don’t know what to do with. Will your kids eat beef cheeks? Maybe. How about kidneys? How about beef cheeks, kidneys, and crusty stale old bread you’ve been storing in the freezer, mixed with sage, nutmeg, and a few other seasonings, and stuffed into a sausage? There you go.

Easy Not-Made-From-Scratch Meat Buns

You can of course make the dough used in these from scratch. However, we must not allow the perfect to be the enemy of the good. Only God is perfect; if you, dear reader, are not a Divine being, you must accept that “good enough” is the best you can do, most of the time. Given the choice between making these meat pies at home and buying something from the frozen aisle, this recipe is quick and easy and at least more natural and healthier than the frozen option.

This is loosely based on a recipe showed me many years ago by a kind lady from Vietnam.

You need:

1 cylinder/package/container of your choice of pre-made biscuit or croissant dough

A handful of fresh mushrooms (your choice, but standard cremini work fine)

One small shallot (or a small piece of onion)

A couple tablespoons of butter

1/4 pound of ground pork

Fennel seed, rosemary, salt, black pepper, sage, marjoram (or thyme)

Brown sugar

Green peas (canned is fine, or use a substitute)

A skillet

A baking sheet and oven

To make the meat pies:

Dice the mushrooms and the shallot - chop it finely, or as much as you feel like working.

Put the butter in a skillet on low-medium heat and add the mushrooms and shallot. Cook slowly until the shallot is translucent and the mushrooms are cooked down and browned.

Add the ground pork and a good pinch of salt. Turn up the heat to medium-high and cook until the pork is mostly cooked through, stirring to mix. Break up the pork as small as possible. If you have one, try using a potato masher to break up the chunks of ground pork.

When the pork is mostly cooked but not browned, add the herbs and black pepper. The mix is equal amounts crumbled sage and crushed fennel seed; add more of either if you want a stronger flavor. Add a pinch of rosemary or to taste, the same with marjoram or thyme. You could substitute crushed red pepper flakes for black pepper if you prefer some added spice. Stir well while the mix continues to cook for a few more minutes and the pork starts browning. Taste, add more salt if needed, then turn off the heat and add brown sugar to taste, maybe a spoonful. Mix well. Taste, add however many peas you want and mix again. (Any other soft green vegetable also works. Leftover cooked greens would be a great substitute for peas.)

Let the mix cool until you can work with it.

Meanwhile, prep your pre-made dough per the instructions on the package. Once you have each piece separated and on the baking sheet, cut or pull it apart down the equator. Put a tablespoonful of your pork mixture in the middle of the bottom half, put the top half of dough over it, and crimp the edges together using the tines of a fork. Or your fingernail.

Bake as directed on the package. Enjoy the meat pies hot or cold.

Roasted Fresh Pork Hocks

You need fresh pork hocks, not cured. Put them in boiling salted water with other aromatics (bay leaf, onion, pepper) as preferred and turn down the heat to a slow simmer. Simmer the hocks, covered, for 90 minutes. This step can be done ahead of time.

Preheat oven to 400.

Score the hocks in a diamond pattern all over and sprinkle with salt. Put in a roasting pan with rack and roast in the oven for about 90 minutes, turning every 30 minutes or so. If the skin is not crispy, finish under a broiler for a few minutes, turning frequently and watch carefully to prevent burning.

Serve with mustard, sauerkraut, potatoes, and lots of other sides. This is a very rich dish, of course, the best part is the crispy fat and skin and you’ll want lots of sides and condiments to accompany it.

Red-Braised Pork Belly

This is based on the recipe for “Dong Po Rou” here (see link), adjusted mostly to use ingredients which may be more commonly found in American kitchens. It takes about 3 1/2 hours and is extremely easy. (“Red Braised” refers to the color meat gets when slow-cooked in one of several kinds of cooking liquid, including soy sauce. And no, it’s not a bright red red, the same character for “red” also describes the color of tea.)

Materials

Pasture-raised pork belly roast 2-3 pounds

2 or 3 bunches of green onions (scallions)

An inch or 2 of ginger

2/3 cup Soy sauce

2 cups Shaoxing wine OR dry sherry OR cream sherry

A few tablespoons of molasses and white sugar, or brown sugar

A covered pot that will fit your pork belly, ideally heavy and ceramic

Method

Scallions and ginger in a ceramic-coated cast iron pot.

Trim the green onions and scatter them in the pot until the entire bottom is covered. If they are too big cut them in half. You need enough scallions to cover the pot, so, perhaps 6-10 plants (2-3 bunches).

Slice the ginger and arrange the slices relatively evenly on top of the scallions.

(Optional) blanch the pork belly for about a minute to firm it up and make it easier to cut.

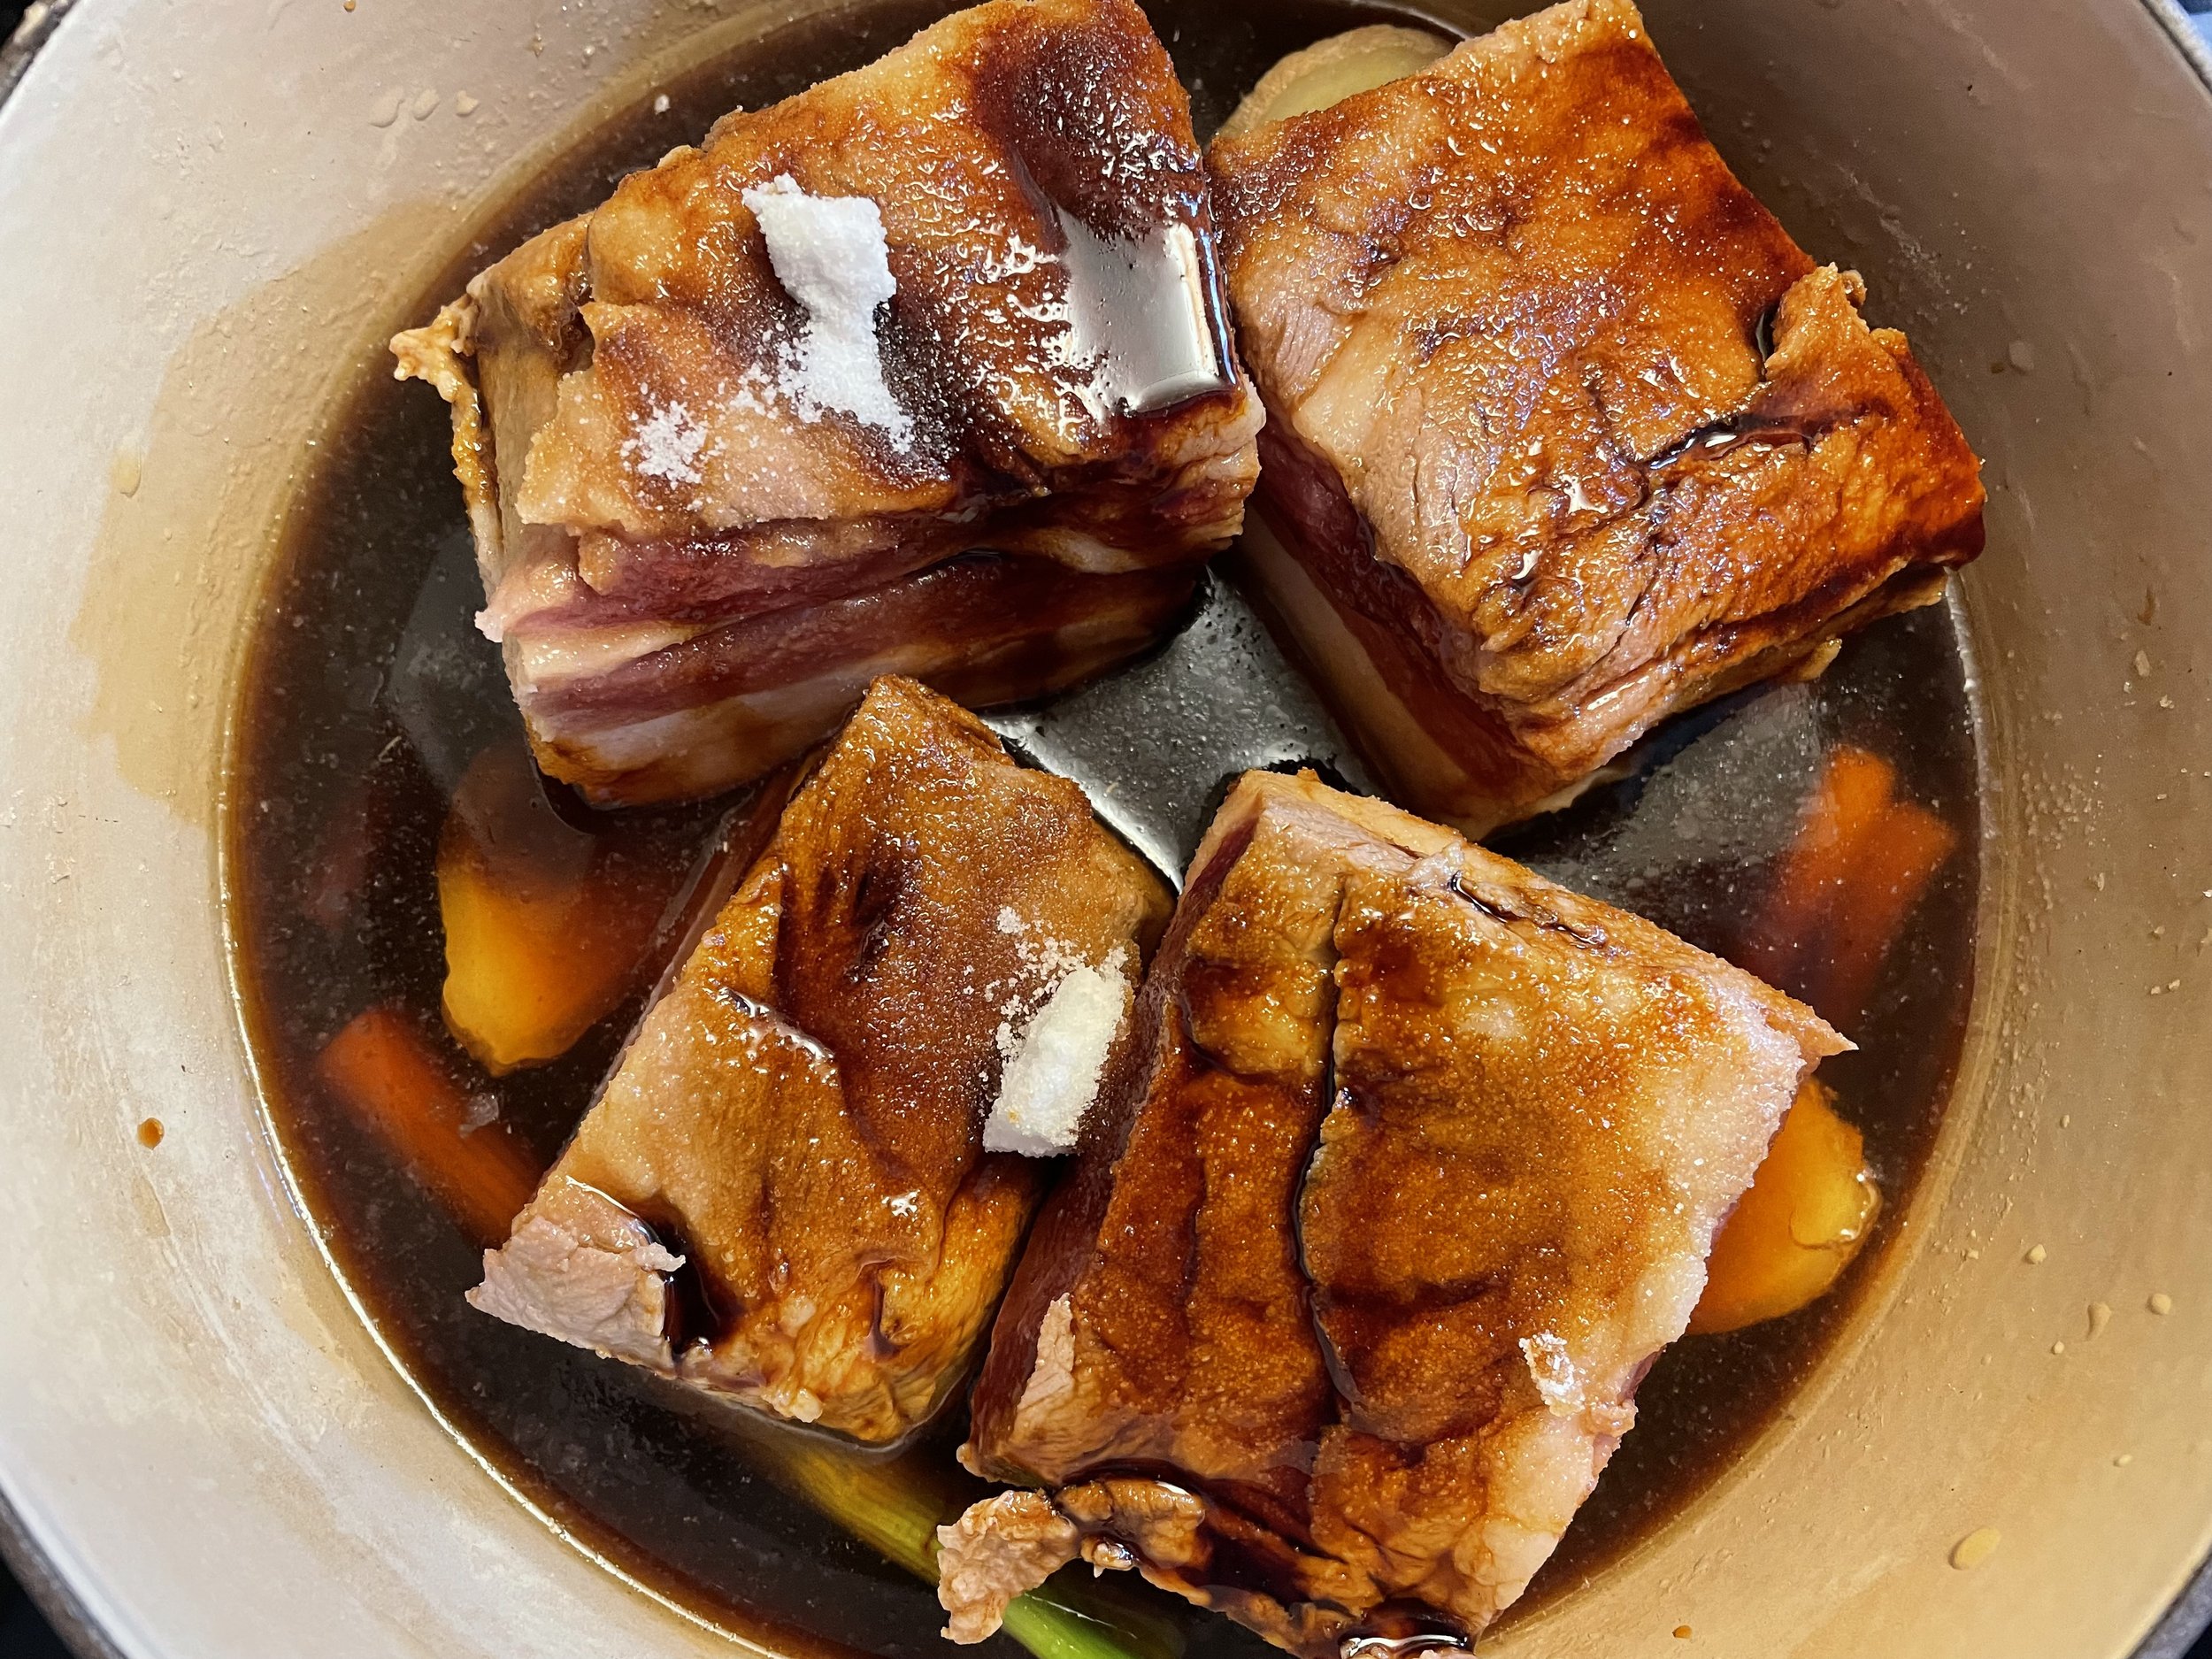
Pork belly pieces in braising liquid and sprinkled with molasses and sugar

Cut the pork belly into pieces 2 or 3 inches on a side. (Leave all the layers of the pork belly intact.)

Place the pork belly pieces fat side up on top of the scallions and ginger.

Pour the wine or sherry (or some mix thereof) and the soy sauce over the pork.

Sprinkle the pork with molasses and sugar or brown sugar. How much depends on what you want. Probably a tablespoon of molasses and 2 T of sugar are a good start. Most of the sugar is probably going to dissolve in the sauce, so if you want sweeter pork but you don’t want to eat the sugar, just skip the sauce.

Cover the pot, bring the mixture to a boil, and then turn down to a low simmer (no need to stir). Cook for one and a half hours and then flip the meat fat-side down and continue cooking, covered, for another 90 minutes.

(Optional) Before serving, take out the meat, put it in a pan and put it fat-side up under the broiler for a couple minutes to brown and slightly crisp the top. (If you’ve left the skin on the pork belly roast you can try to crisp the skin this way, although crispy pork belly would require a different recipe.)

(Optional) Put some of the cooking liquid into a saucepan and cook it over high heat to make a reduction.

Red-braised pork belly served with basmati rice, steamed broccoli raab with toasted sesame seeds, and pickled bamboo shoots.

If you don't want cured pork in a half hog share

We occasionally hear from people who don’t like (or at least don’t eat) cured pork products because of the salt and sugar content, the sodium nitrite, or because they simply prefer the flavor of fresh pork. If you are avoiding nitrite salt-cured pork but instead paying extra for “naturally” cured pork products, you are likely being deceived. Here is our old blog post on why “natural” cures are a scam which are probably less healthy for you than the regular stuff. If you want to avoid added nitrates, you’re going to have to just avoid commercially cured meat. You can make salted and smoked pork belly at home, instead of bacon. Just be aware that the reason cure recipes use pink salt (sodium nitrite) is to safely prevent dangerous toxins which could make you sick or kill you. Of course many people have salted and smoked meats without using sodium nitrite and never had a problem, but there is a risk and you should know what you are doing.

Here is what we would recommend you do if you want a half hog but don’t want cured meat.

Pork belly

Get this in 2-3 pound roasts. It’s very popular to leave the skin on and slow roast it so that the skin crisps in the rendering pork fat. Poke holes all over or cut slits to let the fat out. Without skin you can braise it such as in chashu. There are also many options to roast or braise pork belly in cubes, or fancier cooking options such as lechon kawali (simmer the cubes of pork belly until they are tender, then let them air dry and fry them). For the most versatility, leave the pork belly as a skin-on roast; you can always cut the skin off and cut the roast into cubes, later.

Uncured pork leg

With some fat left on, our pork legs work fine for making boneless roasts. It’s not quite as good as the pork shoulder but it’s certainly good enough. Leg steaks are also excellent. You’ll want to braise them or otherwise slow cook to keep them from drying out. Because of this, you likely don’t need to worry about steak thickness as much as with a pork chop, where thin chops are less forgiving of overcooking. A thinner leg steak will braise faster. As with the belly, cubes of leg meat are versatile and can be used in stews, braises, or grilled on skewers. You can always cut up a roast into cubes later.

Get the ham hock

If you’re avoiding cured meat for health reasons but you do enjoy the flavor, by all means make sure to get some cured and smoked ham hocks! Yes, these are cured and smoked, but while you can certainly eat the meat if you want to, what they’re really best for is to flavor things like beans and rice or vegetable soups. You get the salty, smoky flavor of the ham hock, but diluted in whatever broth you’re using, which means you can control and limit the amount of salt you ingest. Just remove the hock after it has given its flavor to your broth. Unless you are on an extremely strict diet, you’ll be able to enjoy the flavor of cured and smoked pork without actually eating it.

Beans and Rice with Smoked Ham Hock

Dry beans*

Smoked ham hock

Salt

Onion

Celery

Tomato paste

Paprika, Garlic powder, cumin, oregano, sage (or whatever you like)

Lard

A big heavy pot for beans

Rice

A rice-cooking vessel

Soak the dry beans in lots of (optionally, salted) water overnight. *I’m not a big fan of kidney beans, undercooked beans are pretty bad for you and kidney beans seem to take forever to cook. We tend to use small red beans or adzuki beans, which are a different genus but who cares, they look like beans and they taste like beans and they’re called beans, so they’re beans. You could use black beans or pinto beans or any kind of beans, even kidney beans if that’s your thing. Lighter-colored beans cooked with smoked ham hock are going to end up looking kind of dirty, which you may prefer to avoid or maybe you like the grunge look, I’m not judging you for that. Much.

Amounts depend on how much you want. A pound of beans will make a filling family dinner plus leftovers which you can freeze for later. For that amount of beans, probably around 1 large onion and half a bunch of celery would be good, but you could certainly add more onion and celery if you like.

Strain the beans and discard the soaking water.

Dice the onion and celery and sautee them in some homemade cooking lard. A lot of recipes call for bell pepper. Bell pepper is a height-of-summer vegetable. Beans and rice is a cold weather dish for us. We usually have some onions around and we usually have some celery in the garden. Perhaps in the Deep South bell peppers grow in winter, but I don’t think you can grow bell pepper in a Willamette Valley winter, so it doesn’t belong in the dish. Cook with what’s in season. (Canned pickled peppers are a great accompaniment to beans and rice, but unless they’ve been kept crisp which is hard to do, they’re probably best added at the table.)

Add some tomato paste for color and flavor, a few tablespoons is good. If I open one of those six ounce cans of tomato paste I’ll just use the whole thing rather than have a partial can sitting around waiting to be used.

Add the beans and water to cover them by at least an inch, then stir everything well to incorporate the tomato paste without burning it. Add in your smoked ham hocks. One hock is fine for flavor, but there is actually some meat on most smoked ham hocks, so you may want to use more than one and pull off that smoky ham hock meat at the end to mix into the final dish.

Stir in the spices. Paprika is a good idea, at least you can get some kind of red bell pepper flavor compounds this way. Garlic powder would also be good (when is garlic ever bad in a savory dish?) Other spices it depends what you like. We have several sage plants in the garden that seem to always have some leaves, and I’m testing a theory that if you want your kids to eat something, use pizza herbs (oregano).

Bring everything to a boil, then turn the heat down and simmer until the beans are soft and the ham hock is falling apart. If the water is evaporating too quickly, cover the pot, and you may have to top it up with some boiling water. The goal at the end is to not have bean soup but to have a creamy dish in which the bean starches have cooked out into the liquid. When it’s finished, remove the ham hocks and pull off any bits of meat left on them to add to the pot.

If the beans are getting soft and the mixture is too liquid, leave the lid off and turn up the heat a bit, then stir with a wooden spoon making sure to scrape the bottom and try to mash some of the beans against the side of the pot. As you stir and break up the beans their starch will thicken it.

The problem with making these in a slow cooker is that you can’t boil off extra liquid to thicken it, and slow cookers even on high heat probably aren’t quite hot enough to cook the beans thoroughly without taking a really, really long time. Making it in a heavy pot on the stove is probably best.

The beans probably won’t need extra salt after being cooked with smoky, salted ham hocks. Stir in a little ketchup or molasses or brown sugar and a splash of apple cider vinegar.

It’s probably a crime somewhere not to serve these with some kind of rice, cooked however you cook rice. Quinoa would be a lower-glycemic option, though I don’t know if eating lots of quinoa is better than eating just a little rice.

I think beans and rice needs to be eaten with lots of accompaniments so everyone can personalize their dish. Hot sauce, pickled peppers, fresh parsley or cilantro, celery leaves, fresh green onion, grated cheese, diced raw onion, sour cream, diced raw celery, crunchy bean sprouts…or whatever else you like to mix in.

Simple Pork Cuts Checklist/Walkthrough

This is a bare-bones (or boneless - hah!) guide for placing a custom butcher order for half a pig. We have some more in-depth plans elsewhere and there are probably hundreds of cuts you can get from half a pig, so if you have the time and desire to be adventurous then by all means, just start looking at “cuts of pork” and you’ll find a lot. However, if you are ordering a half hog from us or another local farmer so that you can put good food on the table for your family and you don’t have time to do hours of research, here you go.

The primal cuts of pork are the Shoulder, Loin, Belly, and Ham.

  1. Shoulder: If you are going to get any roasts at all, get a Boston Butt roast or two. A smaller 3-pound roast makes leftovers for us (2 adults, 2 small children). The Picnic shoulder also makes good roasts for pulled pork. If you want fewer roasts and smaller cuts, the shoulder can also be cut into steaks. Shoulder bacon is good, and the picnic shoulder is also good ground for extra sausage or cut into stew meat.

  2. Loin: We prefer double-thickness pork loin chops; you could also keep the loin as one big roast or a few smaller roasts. Two double-thick pork chops are a good meal for our family. Bone in means you don’t get baby back ribs, but you do get bones in your chops. The tenderloin cooks differently from other loin meat, so it may be best to have it separate. Grind the sirloin or cut it up for stew meat, it’s not a good cut for chops (unless you really like it.)

  3. Belly: Take the spare ribs in half racks or a whole, and make standard bacon from the belly meat or have it cut as uncured belly roasts.

  4. Ham: A whole cured ham is very large. You can also get it cut into smaller hams. For easy-cooking smaller meals, have the center of the cured ham sliced into steaks and keep the ends as smaller hams. We think thicker ham steaks up to an inch thick are more versatile, but for faster cooking you could go as thin as 1/4 inch. This is not sliced deli ham, you do need to cook it. If you don’t want cured ham you can also make roasts or steaks from a fresh, uncured ham, or you can grind it to get extra sausage. Uncured ham roasts are good but not quite as good as shoulder roasts.

  5. Ground/sausage: You will get a few pounds of ground pork or sausage regardless, from the trimmings. If you want more than a few pounds you’ll need to pick something to add (such as the sirloin, picnic shoulder, or the uncured ham.)

  6. Fat: A couple pounds of fat renders to a couple pints of cooking lard. Leaf lard fat has a more neutral flavor and you can use it in pastries. If you want more lard than that take some back fat, which makes lard that is great for frying and pan-frying. Homemade lard is an excellent cooking fat, but plan to store it in the refrigerator or freezer unless you’re using it up pretty quickly.

  7. Other stuff: Get the hocks cured and smoked to add umami flavor to soups and stews. Extra bones and the pig feet are good for making stock. If you are new to organ meat, the heart is relatively easy to cook and mild in flavor. Pork liver has a stronger flavor than chicken liver; kidneys have quite a strong flavor. Pork jowl is quite fatty and can be braised or cured into a very fatty bacon. The whole head and the tail are probably not worth keeping unless you have specific plans.

Once you know what you want, custom ordering from the butcher is super simple. Here’s the literal text of an email we sent one of our custom butchers recently for a half hog for our family:

Hi [butcher’s name]

It’s [our name] [our phone number]

For our half hog:

Shoulder: make as many 3 pound-ish bone in roasts as possible. Smaller is fine, we want them to fit into a 6-quart slow cooker.

Loin: pull off tenderloin, baby back ribs (full rack), double-thick chops (2 per package), stew meat the sirloin (1 pound pkg).

Ham: grind for sausage

Belly: spare ribs (full rack), regular bacon 1 pound packages.

Sausage: 1/4 breakfast sausage (loose), and split the other 3/4 between brats and ground pork. 1 pound packages
Organ meats none this time, I'll take any trotters and extra bones.

Thanks!

(NB: We eat organ meats but our personal freezer was getting full at the time, and we already had plenty of lard and smoked ham hocks on hand.)