Cooking (BBQ smoking) a pasture-raised pork leg roast
/Bone-in leg roast. Fresh ham. "Green" ham
That's right folks it is time to cook a very large hunk of pork. It's not exactly Christmas anymore but isn't any time a good time to slow cook a gigantic hunk of naturally-good, pasture-raised meat over smoky charcoal?
Step 1: Salt in advance, preferably overnight
The first step is to defrost the bone-in leg roast and salt it with kosher salt. I use kosher salt on meats because the big flakes of salt stick better to meaty surfaces than the squared off salt crystals from regular salt. Which is...why it's used for koshering. Smart!
Salting the meat before cooking helps to draw moisture out of the surface, which helps with the Maillard reaction we're going for on the surface (more on that later). Salting well in advance, say twelve hours or more, allows the salt and moisture to combine and create a version of a brine. If you are concerned about limiting salt in your diet, stop eating commercial processed foods. The amount of salt you sprinkle on meat is not going to make a difference compared to the salt in commercially-processed foods.
Here's the bone-in leg roast sprinkled on all sides with kosher salt. I put it in the refrigerator like this overnight.
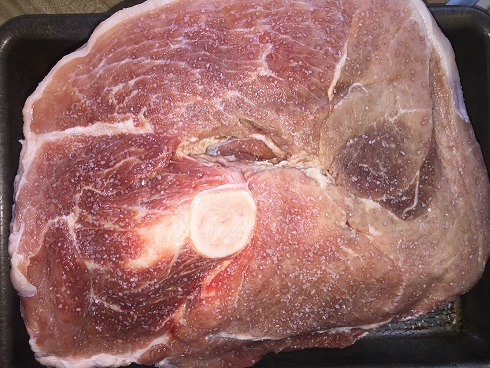
Bone-in pastured pork leg roast, sprinkled with kosher salt prior to cooking.
Step 2: Rub a dub dub give it a rub
I've seen abuelas cook pork leg roasts with just salt, and maybe one day I will be brave enough to try. But I do like to use a good spice rub. You can make your own or buy one. If nothing else, I think adding a spice rub helps to flavor the smoke that is produced when the surface fat begins rendering off the meat.
I considered injecting the meat with additional flavorings, such as apple cider. But I decided I wanted to taste the natural juiciness of the pork this time without any additions.
Start the fire, Billy
I use an upright barrel drum cooker and I just light charcoal in the bottom. I will say I put a sizeable mound of charcoal in the bottom. Definitely more than the "recommended amount". But that's because I was far more concerned with not having to add more fuel than I was with wasting charcoal. Because of the design of the barrel cooker I wasn't worried about it getting too hot. On a regular grill I would have had to add more charcoal partway through cooking.
The barrel cooker is designed (by somebody else, and it was a great idea) to regulate the temperature inside as the meat hangs from a hook (or several hooks in this case) over the coals and drips down onto the coals creating flavorful smoke while convection cooks the meat.

Leg roast in the barrel cooker. In summer I would never allow all those leaves so close to the cooker, but everything is soaking wet all the time right now. Know your fire safety, kids!
Cooking on a kettle grill
It's entirely possible to smoke/BBQ on a kettle grill. I've smoked plenty a pork butt as well as several whole turkeys and barbecued brisket, all on a decent but cheap kettle grill. It does take some care: you need to check the meat and the temperature relatively often and adjust accordingly to try to keep it in the sweet spot of around 250 degrees. Just take it easy: even a few coals can heat up the grill quite a lot, and your main goal is not to cook the meat too fast. And if you don't want to add more coals partway through the cook, just finish it in the oven: by the time you're ready to do so, most of the flavor from the smoke is already in there anyways.
If I were using a standard kettle-style grill, and I have -- the cheap kind not the expensive ceramic woo woo kind -- here is what I would do. I would place charcoal around the inside of the grill in a circle or like a snake eating its own tail. In the middle of that ring I would put a metal pan full of water (not your best roasting pan!) I would put some lit coals on one part of the charcoal snake, and I would make a foil packet, not fully closed, of pre-soaked barbecuing wood chips and toss it on top of the lit coals. Then I would adjust the bottom vent to be almost closed and the top vent to be almost closed and use an infrared thermometer to occasionally test how hot the meat was getting and adjust the vents accordingly. You want to shoot for a cooking temperature of about 250 degrees Fahrenheit. I would plan ahead for the need to add more charcoal. Over time, the lit coals at one end will spread to the unlit charcoal snake you made around the edge of the grill, and will light those coals in sequence to keep the fire burning. I would put the meat in the middle of the cooking grate so it is not directly over the coals. Ideally I would have another pan under the meat to catch the drips and maybe use that to make a sauce. But realistically you probably are going to have the roast over the pan of water because of space constraints. You need the pan of water to help moderate temperature spikes inside the grill (in the same way that if you live on a lake your local temperature is moderated by the lake effect.)
If you have a split-sideways barrel drum grill you can tweak the same method as with the kettle grill, but to be honest you should probably try to get a kettle grill if you want to barbecue anything. Unless your split-drum grill/smoker was priced in the thousands of dollars it's a piece of junk. I'm not saying that's bad, I have junk that I love too.
A "gas grill" is an advertising term for a stove you put outside. I love cooking on gas stoves and I love cooking outdoors, but you can't barbecue on gas.
Cook to 200 degrees for "falling off the bone"
Fourteen hours later the meat turned out delicious. Yes. Fourteen hours. I didn't weigh the raw leg roast on a kitchen scale (it wouldn't fit) but it weighed I would say around twelve pounds.
It was done to the recommended temperature for pork, according to a probe thermometer and a taste test, after about 7 hours, but I wanted to bring it up to the high 190s/200ish Fahrenheit internal temperature barbecued meat needs to reach to get that "falling off the bone", pull-apart tenderness. After ten hours I took it off the hooks and put it on a grill grate, because falling-off-the-bone is good but falling off the hooks into the fire is not. After twelve hours I decided to finish it in the oven. This is a normal cook time, by the way. I was expecting about an hour-ish of cook time per pound of meat.
After action report
In the end it made a very flavorful but very slightly dry pulled pork. The reason for the latter, I'm convinced, is in the first photo up above: the leg roast does have some marbling but it's simply not enough. There isn't enough fat like there is in a shoulder roast to keep it juicy while cooking to 200 degrees F. It does fall off the bone, it does have a nice rich smoky pork barbecue flavor, but it lacks the juiciness of a shoulder roast. It's good, but I would say for me it wasn't worth the extra time and effort. The lean meat is the result of decades of big agriculture breeding programs and while raising the pigs on pasture definitely improves the flavor, it doesn't change genetics. If the pigs eat more than they just get fat, and the pork doesn't get more marbled.
I have another leg roast and when I cook that one I'm going to just take it to an internal temperature of "done" and cut off slices rather than take it all the way to falling apart. I also want to try to get my hands on some fattier, more marbled pasture-raised pork roasts, which means getting meat from heritage breed pigs.